UPDATE: Running pfSense 2.4 and it seems manual patching is not required now. The configuration elements are still valid.
Since Q1 2016, Sky has been carrying out firmware upgrades on the routers they supply their customers with to enable native IPv6 support. I have had IPv6 enabled on my home connection for a couple of months now, here are my findings so far:
- Sky are making use of DHCPv6 for allocating a /56 prefix. Note this is not statically assigned and as such can and does at times change when the router is rebooted.
- IPv6 Prefix Delegation is the mechanism in use. The router makes a request to Sky for a /56 allocation, Sky responds with and assigns a /56 out of a pool.
- With the Sky router plugged in, it just works. IPv6 is preferred where it is an option (surprisingly, there are many sites out there available over IPv6).
That being said, it wasn’t all plain sailing when trying to get this working with my pfSense firewall. This is what I had to do to get it working…
Disclaimer: Note, the current method requires applying patches which are actively being developed. Please use caution and do not try this on a production system without testing first.
Upgrade pfSense to version 2.3.2. Once fully upgraded, apply this pfSense patch. It is worth noting that support for this feature is still very much actively being developed and there are newer iterations of this patch. This is what worked for me.
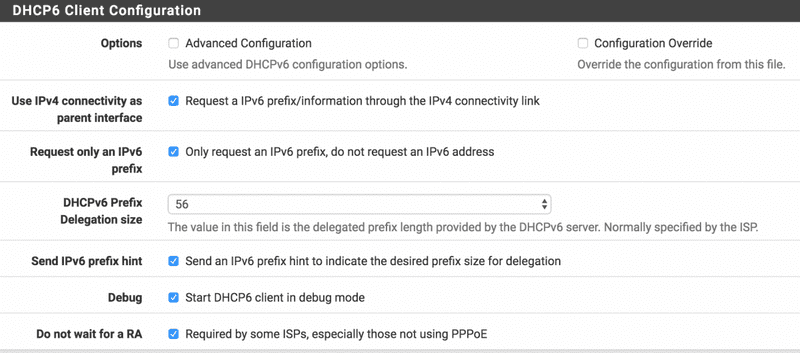
Now you need to configure the WAN interface and select ‘DHCP6’ for IPv6 Configuration Type. Ensure the DHCP6 Client Configuration section looks as follows:

Next, configure the LAN interface:
- Set the
IPv6 Configuration TypetoTrack Interface. - Under the Track IPv6 Interface section, select your WAN interface and set IPv6 Prefix to 0 (this is the default).
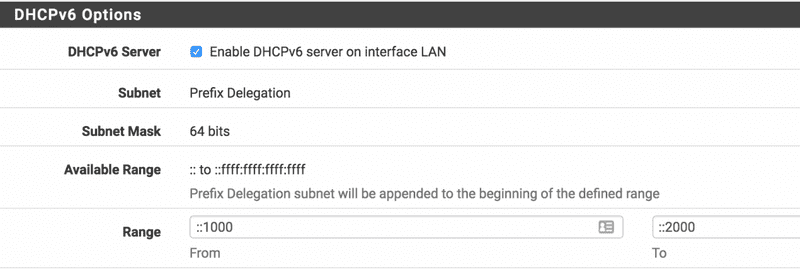
Now configure the DHCPv6 Server and Router Advertisement. Navigate to Services > DHCPv6 Server & RA. Under the DHCPv6 Server tab:
- Tick the
Enable DHCPv6 server on interface LANoption. - Configure a range, I have it set as follows:

- Under the “Router Advertisements” tab, ensure Router Mode is set to Assisted.
Disconnect/ Reconnect your internet connection and you should now have IPv4 and IPv6 connectivity. Note you will see the IPv6 Global Address on your LAN interface.